Flowcharts
The most important part of programming is to solve problems using a programming language. In this lesson, we will study what are the steps involved in problem solving.
While solving the problem the first step is to analyze the problem. It means to know the input and output of the program.
Now, we can’t go on to solve the problem directly. The second step is to divide the problem into sub-problems, so that sub-problems become easier to solve.
Now, we have a vague idea about what the solution looks like. If we write the code directly, our code may be prone to errors and we may need to debug a lot. So, the first part is to write the solution on paper.
It may happen that our code is wrong, so we should verify our program by putting in the input and see if we get the required output. We can rectify the solution if needed.
After this we should write down our code. This reduces the possibility of errors. So, the flow looks as
- Analyze the problem.
- Break the problem into smaller subparts.
- Write a solution on paper.
- Verify the solution.
- Write code.
What is a flowchart?
Flow chart is a diagram illustrating a solution to a given problem. It allows us to break down any process into smaller steps and display it in a visually pleasing way.
We can use our flowchart for documentation. Now, when working on a large project, we have flowcharts for various modules. It can be used for documentation and future use. The documentation can be used for maintenance purposes.
Flowcharts help us to communicate solutions to the team or person.
Components of flowchart.
There are six components of flowchart.
- Terminator

To specify the start or end of the program. Rest lies between them.
- Input/Output

Whenever we need to read input from used or we need to output on screen.
- Process

All part of calculation comes inside the process box.
- Decision

For making decisions we use a decision box. It has only two valid answers – Yes or No.
- Arrow

Arrow is used to connect two different components.
- Connector

We study connectors while studying functions.
Examples
Let us see some examples for better understanding flowcharts.
- Write a flowchart to add two numbers.

- Write a flowchart to calculate Simple Interest given principal, interest rate and time.
Here we have been given principal, interest rate and time. We need to find simple interests.

- Check whether a number if odd or even
In order to check whether a number is odd or even , we need a remainder when divided by 2. To get the remainder we use the%(modulus) operator.
So, in our flow chart, we read a number and output if a number is odd or even.

- Find largest of three numbers
Given three numbers, find which number is the largest.

Loops in Flowchart
Loops are an important part in the world of programming. To avoid the repetitive task we use loops.
Now, suppose we are given an integer n and we are asked to print numbers from 1 to n.
N = 5, Output = 1,2,3,4,5
So, to tackle this problem we create a storage nextNumber and it starts with 1. So, we print the value present at nextNumber and then increment nextNumber. So now the nextNumber is 2 and similarly we get the numbers. We keep checking our variable with n and stop when the variable reaches n.
So, if( nextNumber <= N) we print our numbers else we stop.
Our flow chart will look as

Now, let us take some more examples that involve the loop.
- Find the sum of numbers from 1 to N.
With the given n form user, we need to find the sum of numbers from 1 to N, We know from the formula that sum of first n numbers is n*(n+1)/2.But here we will use a loop to find the sum of numbers. Our flow chart looks as

Exercises
- Write a flowchart to find if the triangle is valid or not. Hint: A triangle is valid if the sum of two sides is greater than the third side.
- Write a flowchart to print all even numbers from 1 to N. N is the input form the user.
- Write a flowchart to check if a number is prime.
- Write a flowchart to find whether the input N is a part of the fibonacci sequence.
- Write a flowchart to find the GCD of two numbers.
Getting Started
The problem with computers is that they do not understand plain english. It understands binary language. The language that we use to write code is in english. So, we need to convert our written language into binary form.
The translator here is the compiler. Our written code is compiled and converted into binary form by the compiler.
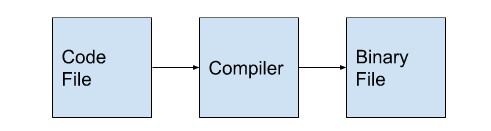
Now, we may make some mistakes in our program. Compiler not only converts file to binary file but also finds the mistakes during compiling. These types of errors are known as compile time errors. The compiler does not make binary files till these compile time errors are removed.
Sometimes the compiler may not make some of the mistakes like the mathematical mistake. These types of errors occur during run-time and hence are known as runtime errors.
Let us see how to compile and run a simple C++ program. You can choose a simple IDE for compiling and running C++ programs like geany, VS code etc. Here we will write our program in a simple editor like notepad and compile it using the g++ compiler.
Our first program is
int main(){
}
Save the file as firstProgram.cpp. Now we compile the program as
g++ firstProgram.cpp
It gives us the output file a.out. If we compile any file we get the output file named as a.out. To change the name we can use
g++ firstProgram.cpp -o firstProgram
So, our output file is saved as firstProgram. To run the output file we use ./firstProgram. So, now our program runs successfully.
Now, we want our computer to display something on the screen. For the same, the command “cout” is used. We write the same as
cout<<”Hello World”;
So, our program looks as
int main(){
    cout<<”Hello World”;
}
Now, when we compile the program we get the error : ‘Use of undeclared identifier cout’.
We need to tell the system where “cout” is located so it can run the program. For this we use,
#include <iostream>
using namespace std;
The first line inserts the iostream file into our file. This file handles the input and output on the screen.
The second line is the namespace line. We can have multiple namespaces, so we need to specify which namespace to use. Here we are telling you to use the std namespace. “cout” can be used in other namespaces also, but here we are calling ‘std’ namespace for “cout”.
Now our while program looks as
#include <iostream>
using namespace std;
Int main(){
	cout<<”Hello World”;
}
Now, we follow the procedure of compiling and running the program. For compiling we write
g++ firstProgram.cpp -o firstProgram
And for running the program we write
./firstProgram
The output for the same is –
Hello WorldVariables and data types
Now, suppose we write a program to add two numbers. Our program will look as
#include<iostream>
using namespace std;
int main(){
a = 10;
b = 15;
c = a + b;
cout<<c<<endl;
}
Here a,b and c are variables. The variables a and b hold the values 10 and 5. The variable c holds the value of a+b. Then, we use cout to print the variable c. The word ’endl’ is used to move the cursor to the new line.
This program gives us the error. The error we get is that we have not specified the type of data for a, b and c.
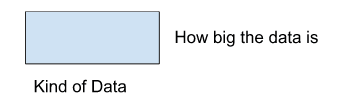
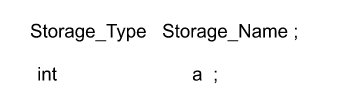
In C++, we need to specify the kind of data and how big the data is going to be.
For storing integers we use the syntax int a. Specifying int in front of variable states that variable a is of type integer. For integer data type, the system generally allocates 4 bytes of storage.
For initializing the value of a we can write int a = 10; So a now has the value 10. So every time a variable is made its type has to be specified at the time of its creation. So, our program will look as
#include<iostream>
using namespace std;
int main(){
	int a = 10;
	int b = 15;
	int c = a + b;
	cout<<c<<endl;
}
This program now runs smoothly and we get the answer as 25.
Just like integers, we have many other data types to store various types of values.
For storing characters we use ‘char’ as char d = ‘x’. Character takes 1 byte.
For storing decimal numbers we use ‘float’ as float f = 10.235. Float takes 4 bytes.
For storing decimal numbers with very large values we use ‘double’ as double d = 123.56. Double takes 8 bytes.
To store the answer as ‘true’ or ‘false’, we use boolean as bool value = true or bool value = false. Boolean variable takes 1 byte. When we print the boolean variable it does not give ‘true’ or ‘false’, rather it gives the value 1 for ‘true’ and 0 for’ false’.
If we do not initialize the variable it will contain some garbage value. It is always a better idea to initialize the variable.
We may want to know the storage space of the data type or the variable. To get this value we use the function sizeof(). If we write sizeof(int), it will give us 4. On some systems the answer may be 2. Similarly try to find storage of all the data types. Now, we know the type of storage and their size.
C++ also has some rules regarding the name of the variables. We can not use the same variable name for storing different data types.
Name of the variables can have – abc…, ABC…, 0123… and _
The only thing is that the variable name can’t start with a number.
Eg. 1b – ❌ , b1 – ✅ , b_1 – ✅
Taking Input
Just like we can print on the screen, we can take the input from the user. To take the input from the user we use ‘cin’.
When we use ‘cin’, at the location of cin, the computer waits for user input. Just like cout, cin is also present in the iostream file. So to use cin we need to include the iostream file. Similar to cout, cin is also present in the std namespace. So, using namespace std is the line we put in our program. Our program looks as
#include<iostream>
using namespace std;
int main(){
	int a,b;
	cin>>a>>b;
	int c = a+b;
	cout<<c<<endl;
}
When we run the program, it asks for the input of two numbers a and b. Our output looks as
8
10
18
We give it the input 8 and 10. It stores 8 in a and 10 in b. Variable c adds a and b and returns c. So we see the value 18 as the sum of 8 and 10.
Just like integers, we can take input for character, float and double.
#include<iostream>
using namespace std;
int main(){
	int i;
	double d;
	char c;
	cin>>i>>d>>c;;
	cout<<i<<endl;
	cout<<d<<endl;
	cout<<c<<endl;
}
We take integer, double and a character as an input. The output of the program looks as
10 1.235 f
10
1.235
f
We input 10 for i, 1.235 for d and character f for c. So, we got the same output as per input.
How is data stored
The data is stored in the computer in binary format. Binary format is 0 and 1. Take for instance a variable int a = 400. How does 400 get stored in the storage? As we are storing 400 in an integer variable and an integer variable gets 4 bytes. First, 400 is converted into binary format and then it is stored.
When we convert 400 into binary we get
400 = 256 + 128 + 16 = 2^9 + 2^8 + 2^4
It is stored as 110010000
We converted 400 as the sum of powers of 2 and then placed 1 for the power of 2 that is used. So in 4 bytes it will look as

So, now we know how the integers are stored. But how do we store characters?
Let char d = ‘Y’;
Computer cannot store ‘Y’ the same as ‘Y’. So, to tackle this problem, what has been done is that each character ‘a’, ‘b’, ‘c’… are given different integer values called ASCII values. So, when we want to store ‘Y’, we don’t store ‘Y’ we see the ASCII table and then store the corresponding number of that character. And that number has to be converted to binary before storing.
We should know what is written in the storage(in binary form) and should also know how to interpret it. Why?
Consider that there are 4 bytes containing some value. When it is interpreted as an integer it gives the integer value but when it is interpreted as character, it gives some other value. To know how to interpret it we use data type. For instance, we make a character say ‘A’, so 65(ASCII value of A) gets stored in the storage. The character takes only one byte. Now, when we try to interpret that byte as an integer, we might get 65 if the other 3 bytes are 0 or we may get some random value depending on the remaining 3 bytes.
Let us take an example
#include<iostream>
using namespace std;
int main(){
	int a = 100;
	char c = a;
	cout<<c<<endl;
}
Output –
d
When we run the program we get the output as d. This is because the character corresponding to value 100 is ‘d’. 100 was stored in the last byte of the 4 bytes and the remaining bytes are filled with 0, hence we get ‘d’ as answer. This is also known as type-casting.
Now, we must see how the float is stored. Let’s take float f = 2.35. First we convert it into binary. It looks like 10.100011. Before decimal it is only 2 and after decimal it is 35.
We need to convert it into the form 1.xxx * 2^e
10.10011 becomes 1.010011 x 2^1
From this part, two numbers are stored – mantessa and exponent
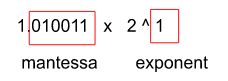
So, in out 4 bytes, some storage is fixed for mantessa and some storage is fix for exponent. We store them differently and read whenever is needed.
This is the same way to store doubles.
We saw one example of type-casting while converting integer to character. Let us see some examples of type-casting.
#include<iostream>
using namespace std;
int main(){
	int a = 19920;
	char c = a;
	cout<<c<<endl;
}
Output –
?
? printed here signifies that either the character is ? or it cannot represent the last byte and so it prints ?. Here c only reads the last byte of integer a.
Let us see another example with float and integer.
#include<iostream>
using namespace std;
int main(){
	float f = 1.2;
	int i = f;
	cout<<i<<endl;
}
Output –
1
Float variable f contains the value 1.2. When we write int i = f, only the integral part of f is copied and the value of i is 1.
This type of type-casting is known as implicit type-casting as the type-casting happens by itself.
Let us see one more example.
#include<iostream>
using namespace std;
int main(){
	int i = 10;
	char c = ‘a’;
	int o = i+c
	cout<<o<<endl;
}
Output –
107
Output value is 107. This is because the value of ‘a’ is 97(in ASCII form), and we added 10. So the value of o is now 107. Hence, we get the output as 107.
We will see explicit type-casting in coming parts.
How are negative numbers stored
Let us take an int variable a. What is the range of a? We have 4 bytes, so what is the maximum and minimum for integer variables? We can store integer in 4 bytes to a limit, so we want that limit.
Let us take 4 bits. For, 4 bits
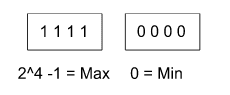
For n bits our max will be 2^n-1 and min will be 0.
This range is for positive numbers, but we also need to store negative numbers. So, 0 to 2^n-1is not actually the range.
We can not store the ‘+’ or ‘-’. So, we use the first bit as the sign bit.
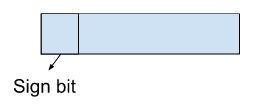
If the value of the sign bit is 0, the number is positive. If the value of the sign bit is 1, the number is negative.
So, for 4 bits
Largest Number – 0 1 1 1 = 2^3-1 = 7
Smallest Number – 1 1 1 1 = -(2^3-1) = -7
This is not really how the numbers are stored. For now, we are saying how to store positive and negative numbers.
But this has one problem.
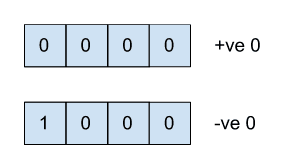
So now we have 2 representations of 0. Because of this we do not use this system.
For positive numbers it is the same. We directly convert to binary. But for negative numbers we follow the following steps –
- Forget the negative sign.
- Convert the number to binary.
- Take 2’s complement.
- Store the result.
So, what is 2’s complement?
For getting the 2’s complement, we take the number, do it’s 1’s complement and add 1. Eg. Take the number 0101 (in binary).
1’s complement of 0101 is 1010. Now we add 1 to it, so we get 1011. So 2’s complement of 0101 is 1011.
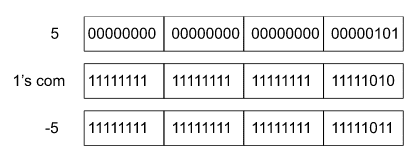
So, if we want to store -5 we follow the steps –
- Forget negative sign so 5
- Convert to binary – 0101
- Get 2’s complement – 1011
- Store 1011
So, -5 is stored as 1011. The first bit is the sign bit, as it is 1 the number is negative. Now to get the number back, we follow the steps –
- Sign bit is 1, so number is negative
- Stored number is 1011
- Take 1’s complement 0100
- Add 1 for 2’s complement – 0101
- Number is 5 of negative
Now, let us see how it is actually stored on the computer.
int a = -5.
int takes 32 bits, so storing a will take 32 bits.
So, -5 is stored in the above way. (This is not totally correct, but for now please proceed with the stated way. We will correct it as we move forward.)
Now, we know how positive and negative numbers are stored. Now, we can know the range of numbers for n bits of memory.
For fout bits our max will be – 0 1 1 1 = 7 and min will be 1 0 0 0.
Min – 1 0 0 0, 1 signifies negative number. 1’s complement of 1 0 0 0 is 0 1 1 1. 2’ complement is 1 0 0 0 = -8
For n bits max = 2^(n-1)-1 and min = -2^(n-1).
Before our range, when we did not use a complement was, -2^(n-1)-1 to 2^(n-1)-1.
And now our range is -2^(n-1) to 2^(n-1)-1. So now we do not have a problem of positive and negative zero.
Now, if we use 2’s complement we are able to store an extra number.
All other data types like float, double, long have 1 bit reserved for sign.
But what if we want to use only positive numbers. We have an option for the same. For just positive numbers we use the keyword unsigned.
If we write unsigned int a – then a only stores positive numbers. So for unsigned data type our range becomes 0 to 2^n-1.
Note – For characters it is not clearly defined whether a sign bit is present or not. It will depend on the compiler. But if we do not want sign we can always write
unsigned char c;
If we want it to be signed we can write
signed char c;
It specifies that character c will have a signed bit. But what happens if we accidentally give signed value to an unsigned data type as stated below
unsigned int b = -123;a
Now, if we try to print the value of b we get 4294967173. Why do we get such a big number?
Here, first we will store -123 in a binary form, just like a negative number gets stored. So, the number stored will be the 2’s complement. And that number will be huge.
So, -123 becomes 4294967173 because the sign bit becomes 1 while storing the negative number.
Let us see another example between char and int
char a = 234354;
We assigned the value 234354 to a char data type. But a is a char variable. When we print the value of a we get ‘r’ printed on the screen.
The reason for this is that, when we give a large number, it stores in 4 bytes. But a is only assigned the last byte. So, whatever will be the value present in the last byte, according to the ASCII value that character is printed. And the output we got on the screen is ‘r’.
Conditional and Loops
Conditional
In the flowchart we learned about decision boxes. And we put a condition in the decision box. And based on the condition we chose the direction. Simple example with a decision box is stated below –
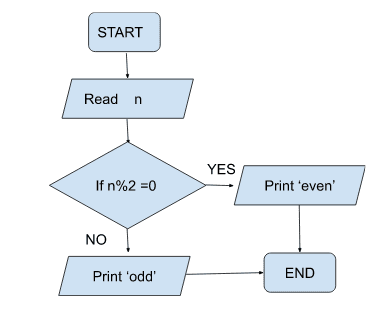
Here our decision box contains the condition – if %2==0. According to the condition we print ‘even’ or ‘odd’.
In code our decision box looks as –
if (condition) {
	// block 1
}
else{
	// block 2
}
So, if the condition is true then block 1 gets executed else block 2 is executed.
Let us see some examples
1. Find whether two integers(input by user) are equal or not.
The user will enter two numbers. If both the numbers are equal we print ”Equal” else we print “Not Equal”. Our program will look as
#include<iostream>
using namespace std;
int main(){
	int a,b;
	cin>>a>>b;
if(a==b){
	cout<<”Equal”<<endl;
}
else{
	cout<<”Not Equal”<<endl;
}
return 0;
}
So, here the user enter two numbers. Then we reach a decision box. The decision box checks the condition. If the condition is True, we print “Equal” else we print(“Not Equal”).
We can have a condition inside another condition as shown in example below
#include<iostream>
using namespace std;
int main(){
	int a,b;
	cin>>a>>b;
if(a==b){
	cout<<”Equal”<<endl;
}
else{
	if(a<b){
		cout<<”a is smaller”<<endl;
	}
	else{
		cout<<”b is smaller”<<endl;
}
return 0;
}
In this part, if both the numbers are equal, we print equal. If the condition is false, we move to the else block. In the else block we have another condition, it checks whether a is less than b. If the condition is true, we print ”a is smaller” else we print “b is smaller”. This type of if else statement is known as nested if-else condition.
One interesting part of if-else block is else if. We can write the previous code as
if(a==b){
	cout<<”Equal”<<endl;
}
else if(a<b){
	cout<<”a is smaller”<<endl;
}
else{
	cout<<”b is smaller”<<endl;
}
It will work the same way as the previous code. The workflow of the code looks as
- If the condition inside if is true, “Equal ” is printed.
- If the condition inside if is false, we go to the else if block. If the condition inside it is true, “a is smaller” is printed.
- If first both the conditions are false, “b is smaller” is printed.
Let us take another example.
2. Write a program to know if the number is even or odd.
Our code looks as
#include<iostream>
using namespace std;
int main(){
	int n;
	cin>>n;
if(n%2==0){
	cout<<”Even”<<endl;
}
else{
	cout<<”Odd”<<endl;
}
return 0;
}
Here, the user enters a number. If the number is even, then the remainder when divided by 2 will be 0. So, our condition is n%2==0, if it is true, we print “even” else we print “odd”.
While Loop
We use loops to execute part of code multiple times, without writing repeatedly. The block executes till the condition is true. Let us see some of the examples.
1. Print numbers from 1 to n.
#include<iostream>
using namespace std;
int main(){
	int n;
	cin>>n;
	int i = 1;
while(i <= n){
	cout<<i<<” ”;
	i = i + 1;
}
cout<<endl;
}
return 0;
}
Output
5
1 2 3 4 5
So, the user enters the number 5. So numbers from 1 to 5 are printed and the cursor moves to next line at the command cout<<endl;
The loop here is :
while(i <= n){
    cout<<i<<” ”;
    i = i + 1;
}
Our i is 1, n is 5 so the condition (i<=n) is true, so we print i i.e. 1. Now, we increase i to i+1 i.e. 2.
Now, our i is 2, n is 5 so the condition (i<=n) is true, so we print i i.e. 2. Now, we increase i+1 i.e. 3.
The loop goes on till i becomes 5. When i becomes 5, we print 5, now i is increased to i+1 i.e. 6. So now our condition 6<=5 becomes false and we exit the loop.
So, we get the numbers printed form 1 to n.
2. Check whether the number is prime or not.
A number is prime if it is only divisible by 1 and the number itself. You might have made the flowchart to check whether the number is prime in chapter 1. Now, we will convert that flowchart to the code. The flowchart for checking prime numbers is stated below.

The program starts. It takes input from the user. We initialize the variable div to 2, and divided to false. We run div from 2 to N. If for any div, N%div becomes 0 then divided becomes “true”. We increase the value of div by 1 every time. As the condition becomes false, we exit the loop. Now, we check the value of the variable “divided”. If the variable is “false”, we print “Prime”, else we do not print anything. And we exit the program.
Let us take the case for N = 10;
Our variables are N = 10, div =2, divided = false. Let us see our program for each iteration.
1st iteration N = 10, div = 2, div < N = true, 10 % 2== 0, divided = true, div = 3
2nd iteration N = 10, div = 3, div < N = true, 10 % 3 != 0, divided = true(from 1st iter), div = 4
3nd iteration N = 10, div = 4, div < N = true, 10 % 4 != 0, divided = true(from 1st iter), div = 5
4nd iteration N = 10, div = 5, div < N = true, 10 % 5 == 0, divided = true, div = 6
5nd iteration N = 10, div = 6, div < N = true, 10 % 6 != 0, divided = true(from 4th iter), div = 7
6nd iteration N = 10, div = 7, div < N = true, 10 % 7 != 0, divided = true(from 4th iter), div = 8
7nd iteration N = 10, div = 8, div < N = true, 10 % 8 != 0, divided = true(from 4th iter), div = 9
8nd iteration N = 10, div = 9, div < N = true, 10 % 9 != 0, divided = true(from 4th iter), div = 10
div now is not less than 10, so we exit the loop. The value of the variable divided is true, so we do not print anything. So we get that 10 is not prime.
Let us write the code for the above flowchart
#include<iostream>
using namespace std;
int main(){
int n;
cin>>n;
int div = 2;
bool divided = false;
while(div<n){
	if(n%div==0){
		divided = true;
	}
	div = div + 1;
}
if(div==1){
	cout<<”Prime”<<endl;
}
else{
	cout<<”Not Prime”<<endl;
}
return 0;
}
Patterns
Now, let us use our loop to print some of the patterns.
1. Print the pattern
1
1 2
1 2 3
1 2 3 4
We need to print the pattern. For this we break our problem into smaller problems.
First we take an input, n. Now, to print we go row by row. Once we press enter we can not go back to the old row. So, we need to go row by row.
So, in a while loop we have
while( i <= n){
	// we print the data on ith row
}
Now, we need to know how the ith row works. In our row, we see numbers running from 1 to i. So, it is another loop. We initialize a variable j that runs from 1 to i. And we get our ith row.
Then we increase the value of i and run our inner loop again.
So, our code looks as –
#include<iostream>
using namespace std;
int main(){
	int i=1, j=1, n;
	cin>>n;
	while(i<=n){
		j = 1;
		while(j<=i){
			cout<<j<<" ";
			j = j+1;
		}
		cout<<endl;
		i = i + 1;
	}
	return 0;
}
We have the variable i and j, both are initialized at 1. We take the input form user and store it in n. Now, for our rows we run the loop from i to n. Now, to print in the row, we run another loop from 1 to i to print the ith row.
For i = 1, we run from 1 to 1 and we only print 1.
For i = 2, we run from 1 to 2 and we print 1 2.
Similarly, we print for the particular row, depending on the value of i.
In all the basic pattern questions, it is better to think and write a solution on paper and then code it.
Let us take another pattern question
2. Print the pattern
1
2 3
4 5 6
7 8 9 10
Our pattern looks similar to the last pattern. In this pattern, in each row instead of starting from 1, we start from a certain value. That certain value is the increment of the last printed value. So, here we initiate another variable that starts with 1 and it prints the numbers that are equal to the number of rows. For instance, for row no. 4 it will print 4 numbers starting from some value. So, we need a variable that prints the value.
So, our program look as
#include<iostream>
using namespace std;
int main(){
	int i=1, j=1, n;
	cin>>n;
	int val = 1;
	while(i<=n){
		j = 1;
		while(j<=i){
			cout<<val<<" ";
			j = j+1;
			val = val + 1;
		}
		cout<<endl;
		i = i + 1;
	}
	return 0;
}
Here, our program is the same as the last program. The only difference is that instead of printing variable ‘j’, we are printing variable ‘val’. And we got our desired output.
Patterns are an important aspect of any programming. It will help us in getting familiarity with the loops and in building logic. So in the next part, we will draw various patterns with the help of the loops.
Patterns
In this part we will solve various questions of patterns. We will develop a procedure to print the required pattern. Following that procedure we will be able to print any pattern.
For printing a pattern, we first need to know the number of rows. For example, we are given N = 5, so we either print 5 rows or a function of 5 numbers of rows.
Second thing is, in an ith row how many columns we need to print.
Third thing is to know what to print.
Consider the pattern for N = 4
* * * *
* * * *
* * * *
* * * *
Seeing the pattern, we notice that for N rows, in each row we should have N columns in the ith row. The thing that we need to print is *.
- Number of rows = N
- Number of columns = N
- What to print = *
So, our code looks as
#include<iostream>
using namespace std;
int main(){
	int i=1, j=1, n;
	cin>>n;
	while(i<=n){
		j = 1;
		while(j<=n){
			cout<<"*";
			j = j + 1;
		}
		cout<<endl;
		i = i + 1;
	}
	return 0;
}
Consider another pattern for N = 4,
*
* *
* * *
* * * *
Seeing the pattern, we see that
- Number of rows = N
- Number of columns in ith row = i
- What to print = *
So, our code looks as
#include<iostream>
using namespace std;
int main(){
	int i=1, j=1, n;
	cin>>n;
	while(i<=n){
		j = 1;
		while(j<=i){
			cout<<"*";
			j = j + 1;
		}
		cout<<endl;
		i = i + 1;
	}
	return 0;
}
Number Patterns
In the same way, we can print many patterns. Now, let us see some of the examples.
мелбет казино скачать мелбет казино скачать
Quietly enthusiastic about this site after the past few hours of reading, and a stop at ilanub extended that enthusiasm, the calibration of enthusiasm to evidence is something I try to maintain and this site has earned a calibrated quiet enthusiasm rather than the loud excitement that usually fades within a day or two of finding something.
ткань для перетяжки дивана https://tkan-dlya-mebeli.ru
выезд нарколога на дом круглосуточно выезд нарколога на дом круглосуточно
цветочный букет недорогие букеты в москве
Купить iPhone http://kupit-iphone43.ru в Нижнем Новгороде по выгодной цене с гарантией качества. В наличии популярные модели Apple, различные цвета и объемы памяти. Удобная оплата, доставка по городу, возможность покупки в кредит или рассрочку.
букет цена букет сайт
Купить iPhone http://kupit-iphone43.ru в Нижнем Новгороде по выгодной цене с гарантией качества. В наличии популярные модели Apple, различные цвета и объемы памяти. Удобная оплата, доставка по городу, возможность покупки в кредит или рассрочку.
доставка цветов на дом доставка заказ цветов с доставкой в москве
Купить iPhone http://kupit-iphone43.ru в Нижнем Новгороде по выгодной цене с гарантией качества. В наличии популярные модели Apple, различные цвета и объемы памяти. Удобная оплата, доставка по городу, возможность покупки в кредит или рассрочку.
ии презентация https://www.litteraesvfu.ru
Whitecrest Resort https://whitecrestonline.com.au offers excellent conditions for relaxation and rejuvenation. Modern infrastructure, comfortable accommodations, active recreation, and a tranquil atmosphere create the perfect vacation setting.
Нуждаете се спешно от пари в брой? Заложна къща Галерия 65 Варна предлага бързи заеми, обезпечени със злато, електроника, часовници и други ценности. Предлагаме конкурентни оценки на имоти, бърза обработка и професионално обслужване.
Огонь войны разгорается с новой силой! Танец драконов в самом разгаре — Таргариены сходятся в кровавой битве за Железный трон. Новые альянсы, предательства и эпические сражения в небе Вестероса. Смотри онлайн – https://dom-drakona-3-sezon.top/. Ставки выше, драконы яростнее, исход – непредсказуем.
Нуждаете се спешно от пари в брой? Заложна къща Галерия 65 Варна предлага бързи заеми, обезпечени със злато, електроника, часовници и други ценности. Предлагаме конкурентни оценки на имоти, бърза обработка и професионално обслужване.
Whitecrest Resort https://whitecrestonline.com.au offers excellent conditions for relaxation and rejuvenation. Modern infrastructure, comfortable accommodations, active recreation, and a tranquil atmosphere create the perfect vacation setting.
Whitecrest Resort https://whitecrestonline.com.au offers excellent conditions for relaxation and rejuvenation. Modern infrastructure, comfortable accommodations, active recreation, and a tranquil atmosphere create the perfect vacation setting.
Нуждаете се спешно от пари в брой? Заложна къща Галерия 65 Варна предлага бързи заеми, обезпечени със злато, електроника, часовници и други ценности. Предлагаме конкурентни оценки на имоти, бърза обработка и професионално обслужване.
casino score monopoly live today http://www.monopoly-live-score.com/ .
Самое полезное для вас: https://home-parfum.ru/products/giorgio-armani-armani-green-100-ml/
Самое интересное: https://spainslov.ru/site/word/word/%d0%9e%d0%a0%d0%98%d0%93%d0%98%d0%9d%d0%90%d0%9b
Полная версия статьи: https://spainslov.ru/site/word/word/%d0%9e%d0%91%d0%92%d0%98%d0%9d%d0%af%d0%a2%d0%ac
Читать далее: https://home-parfum.ru/catalog/moschino_m/
капельница от запоя самара капельница от запоя самара
капельница от похмелья https://kapelnicza-ot-pokhmelya-samara-38.ru
Closed it feeling slightly more competent in the topic than I started, and a stop at buildclearobjectives reinforced that competence boost, real learning is rare in casual online reading but it does happen sometimes and this site managed to make it happen for me today which is genuinely worth pausing to acknowledge.
Расширенный обзор: https://l-parfum.ru/catalog/yves-saint-laurent/black-opium-nuit-blanche/
Для подачи документов в иностранные учреждения часто требуется актуальная справка о несудимости. Мы помогаем оформить документ и подготовить его для дальнейшего использования https://laws-moscow.com/kogda-nuzhna-spravka-o-nesudimosti-s-apostilem/
Читать расширенную версию: https://l-parfum.ru/catalog/litsenziya/dolce_gabbana/2219/
Посмотреть на сайте: https://detivmodnom.ru